|
|
|
|
Home |
|
Intro |
Gear |
About |
Trips: |
2026 |
25 |
24 |
23 |
22 |
21 |
20 |
19 |
18 |
17 |
16 |
15 |
14 |
13 |
12 |
11 |
10 |
09 |
08 |
07 |
06 |
05 |
04 |
UBXC |
Apps |
eBook |
|
Tips for Building a
Single-Pole Skiing Sled
by: Tim Kelley
(2012)
|
|
|
|
|
I've been asked a lot of times
for tips on how I make my single-pole skiing sleds. So ... I made
this web page to answer such questions. I've been making and using
single-pole sleds for my ski trips for over twenty years now. I've
used single-pole sleds for overnight trips, ultra-ski racing, skiing
Alaskan long distance dog sled trails (like the Iditarod, Quest, Kobuk
and Kusko) and backcountry trips in the mountains. I like single-pole sleds for skiing because you don't have any interference with your
ski poles like you can have with double-pole sleds. And with the
universal joint on the hip belt you have a greater freedom of motion for
your torso than with a double pole sled, which makes it more comfortable. I won't claim that single-pole sleds are perfect, they surely have their limitations. But
they are the only type of sled that I like to ski with.
I should point out that on this web page I am simply
giving tips. I am not detailing how to make a single-pole sled.
I strongly believe that skiers should put their own effort in designing
and building their ski trip sleds. Why? Because when your
sled breaks out in the middle of nowhere ... you will know how to fix
the sled and get to your destination if you were the one that built it.
(And if you were the one that designed the sled and it breaks on you ...
then you can't blame me! ;-) )
With the sleds that I build, I try to use parts that
are readily available, and not parts that take a lot of fabrication to
create. And I try to keep the sled simple and tailored to the type
of ski trip I will be using it for. So - this design works for me
... |
|
Sled |
|
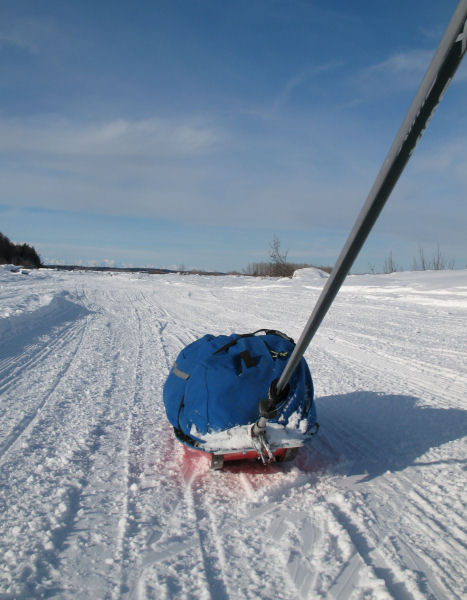
The first order of business
is to obtain a plastic sled. The sled should be designed
so that it tracks straight, rides up over and doesn't plow
through soft snow, holds the amount of gear you intend to bring
and has a lip on the front to mount your hitch hardware.
My favorite sled is made by SLM (Saint Lawrence Manufacturing)
in Canada. But unfortunately, these perfectly shaped sleds
that once were sold for 10 dollars a piece in sports and grocery
stores in the 80's and 90's are no longer made. So you
will have to search to find something that will work for you.
To protect the plastic on the
bottom of the sled from ice and rocks I attach dog sled runners
to the base of the sled. I do this by using the QCR (Quick
Change Runner) runner system. Mushing supply stores or web
sites will have access to QCR or the equivalent. The end
result with QCR are plastic runners with no holes or screws
showing on the base. |
 |
 |
 |
| Here is the bottom of a
finished sled. You can see the hitch attachment on the lip
of the sled and the installed QCR runners. |
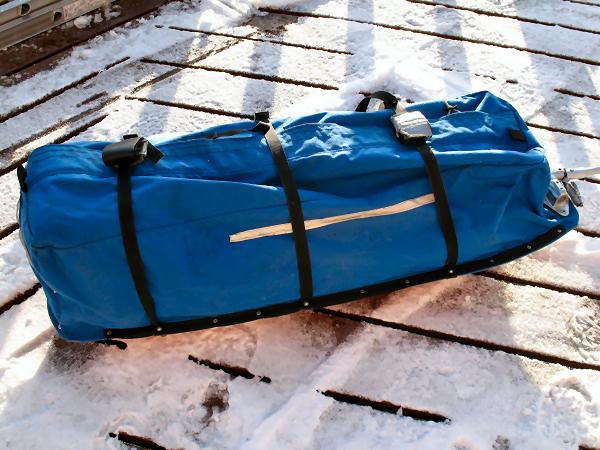
Here are examples of an
ultra-ski racing sled, a several day sled and an expedition
sled. |
For longer trips where there
is no re-supply for many days I use longer sleds. This one
is two sleds back to back that are pop-riveted together. |
|
|
Hitch and
Harness |
|
The single-pole aspect of
this sled is defined in the hitch and harnessing arrangement.
Attached to the sled is a rigid pivot that moves up and down.
I make this using Hollaender "Speed Rail" parts. These are
parts that are used to make metal railing like you might see for
industrial hand rails. You can buy them off the web. A six
foot section of aluminum tubing is used to run from the hitch to
the harness. Aluminum tubing can be bought at local
hardware stores.
The six foot pole is attached
on the other end to a universal joint that is connected to a hip
belt. For a universal joint - I use a metal sheetrock pole
sander head. I modify the connector of the pole sander had
to fit the tubing (see below). I then pop rivet the
sanding head to a weight lifting belt. I like weigh
lifting belts for this application instead of packframe hip
belts, they are more comfortable and easier to attach the sander
head to. |
 |
 |
|
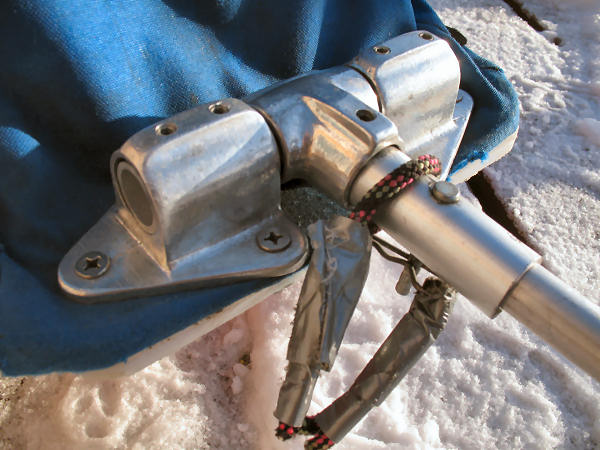
Here you can see two Speed Rail triangular flange bases attached
to the lip of the sled. A Speed Rail tee is attached to a
piece of 3/4 inch (inside diameter) pipe that runs through the
flanges. Out of the tee runs a short section of 3/4 inch
pipe that a six foot long section of 3/4 inch (outside diameter)
aluminum tubing runs into. The pipe between the
flanges and that coming out of the tee are held in place by set
screws in the Speed Rail parts. The six foot tube is
connected to the tee extension pipe by use of a clevis pin.
As you see, I use a small tether on the friction clip that goes
through the clevis pin - so I don't lose the clip in the snow
when I have to take the hitch apart. |
 |
|
Here you can see a piece of
white plastic I used to reinforce the sled tip. This helps
keep the sled tip from cracking or breaking in situations when
the sled is stressed heavily. (If you want to get really
fancy - you can reinforce the sled lip with carbon fiber like
the picture of the green sled up higher on this web page).
For fastener hardware I use stainless steel. And the nuts
are all nylon lock nuts so they don't jiggle loose. |
 |
 |
|
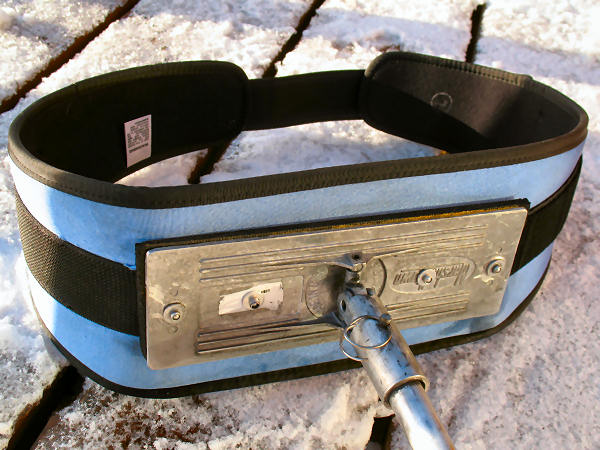
For a waist belt, I like to
use nylon weight lifting belts. The nylon webbing that
goes around the belt is great for attaching the pole sander
head. Above (on the left) you can see the metal pole
sander head pop riveted to the waist belt. On the photo
above and to the right you can see how the attachment of the
aluminum tubing to the sander head works. The aluminum
tubing slides over the threaded stub of sander head (note: you
may have to grind down the threads to make the tubing slide over
the stub). Covering the the tubing I make a sleeve from
aluminum pipe. This gives extra strength to the connection
(I've never had this part break or fail, at least not yet!).
Through the sleeve, the tubing and the pole sander connection
stub I drill a hole and connect it all together with a clevis
pin. |
|
|
Bag |
|
I custom sew sled bags for my sled.
I've seen people use duffle bags before, but the problem with them is
that snow can load around their edges, fill into the sled and make your
load heavier and wetter. I use cordura nylon and basically sew up
a bottomless duffel bag the size of the sled. The "slipperier" the
finish on the fabric the better, as snow will shed from it easier.
I attach the bag to the sled by rolling the fabric over the edge of the
sled and then using pop rivets with nylon webbing for reinforcement.
I also fasten on nylon webbing cinch straps so the load can be
stabilized. The fabric on the front of the bag is clamped under
the sled hitch. |
 |
 |
 |
| Here is an
example sled bag, attached to a plastic sled. A heavy duty
zipper, with a flap over it, runs the length of the bag.
You can see the cinch straps and neoprene loops for carrying an
extra ski. |
This photo
shows more detail of the pop rivets and nylon
webbing that holds the bag to the sled. |
A very
important part of the sled bag is a small pocket near the front
of the sled. This is where you put repair items (extra
screws, bolts, washers, nuts, clevis pins and clips, cotter
pins, wire, cord, small wrench and Leatherman tool). |
|
|
Single-Pole
Skiing Sleds in Action ... |
 |
 |
 |
 |
|
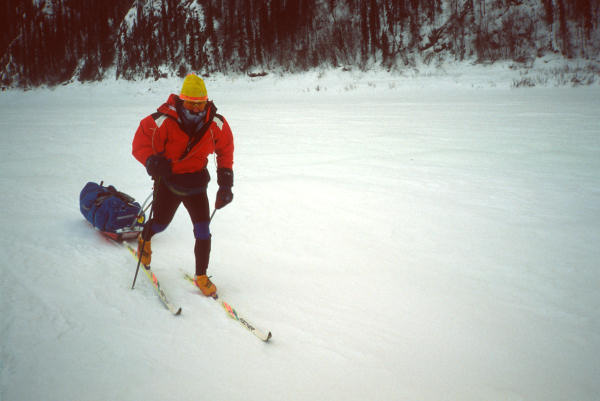
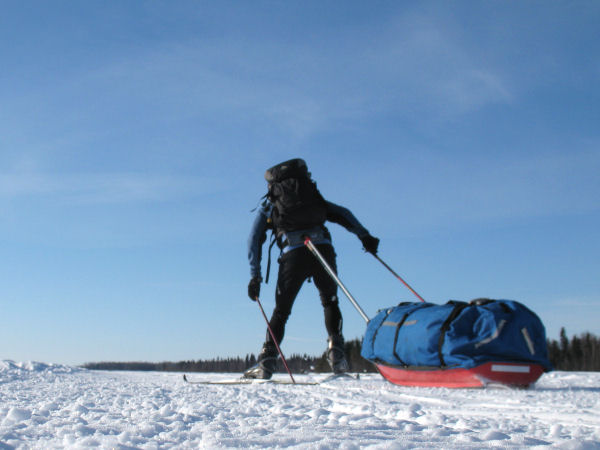
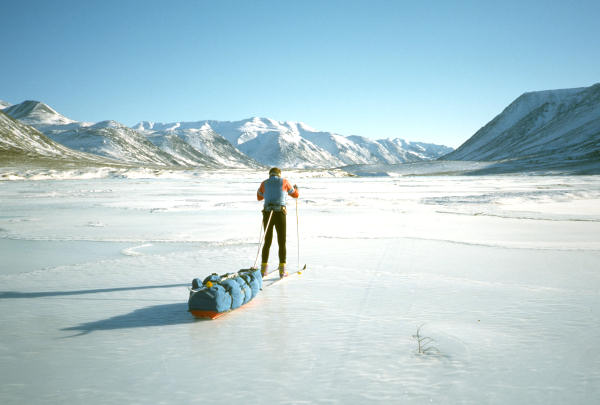
On the Susitna Valley Winter
Trail. You can distribute weight between a small
pack and your ski sled as I'm doing here. This
arrangement also works well when in mountainous terrain when
you have more side-hills. |
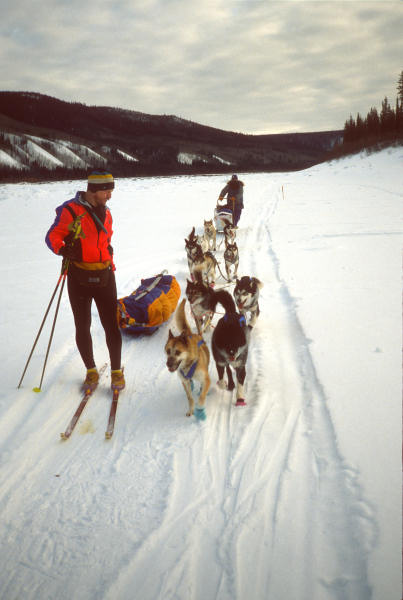
Bob Baker, and the single-pole sled he made, lets a dog team pass on the Yukon
River. |
Bob Baker, skiing the Yukon
Quest, shows why dog sled runners are good to have on
plastic sleds. You never know when you will have
to drag the sled over rocks and ice. This dirt and
rock section, thanks to gold miners moving equipment,
was 30 miles long. |
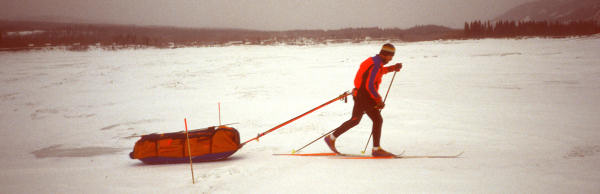
Bucking a headwind on the
Yukon River while skiing the Yukon Quest Trail. |
 |
 |
 |
 |
|
Tim Miller with a sled I
built on the Kobuk 440 trail. On hard trails these
sleds can fishtail a bit when you skate. |
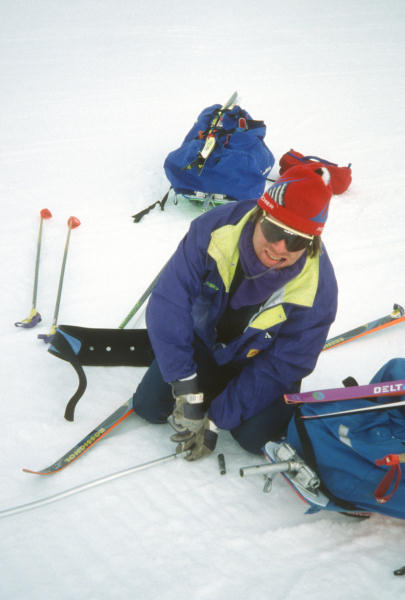
Here I am fixing a broken
sled pole near Selawik, AK. I had to drill new
holes in the aluminum tubing with a Leatherman tool awl.
The fix only took 10 minutes because I was prepared for
it. You should be ready to fix your sled when it
breaks. |
Tim Miller pulling a
single-pole sled across the Brooks Range. These
sleds don't track well on glare ice when you make sudden
turns ... but it's doubtful a light sled of any design
would handle this. |
 |
 |
 |
 |
|
Here I pull a single-pole
sled into a light breeze near Unalakleet on the Iditarod
Trail. |
On an Iditarod Trail covered
in volcanic ash. Note the spare ski poles attached
to the sled pole with velcro straps. |
Camping in the willows on
the Kuskokwim River downriver from Kalskag. Often
I unload my sled in the tent and sleep on top of it.
Even if the sled only fits under your butt-to-head area,
the flat surface above the snow lets you sleep better. |
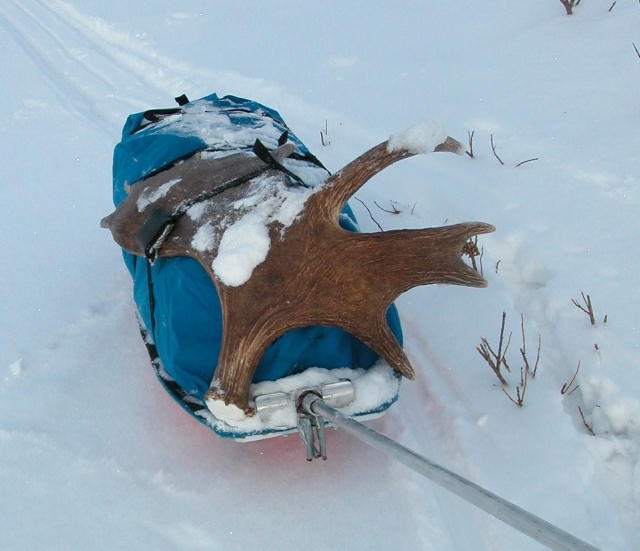
It's good to make sure your
sled has ample attachments for carrying gear on top of
the sled if you need too. Or to carry out cool
stuff you may find. |
 |
 |
 |
|
Add reflective tape to your
sled and equipment if you are skiing at night on
snowmobile trails. |
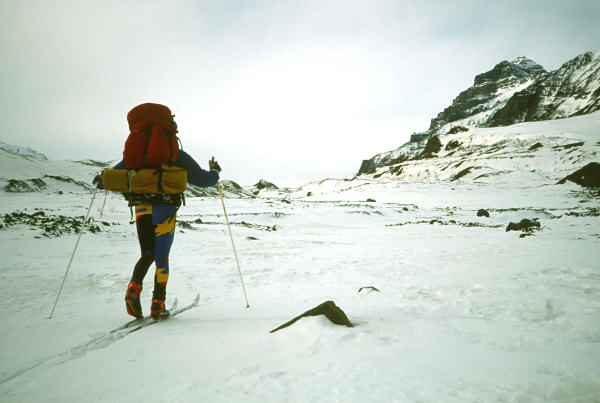
Some people don't like sleds
and prefer to use packs alone. This is always an
option. Here Audun Endestadt heads across the
Wrangell Mountains with a large pack (while Art Ward and
I split our loads between a pack and sled). |
Bob Baker on the Yukon Quest
Trail ... pulling a single-pole sled 1000 miles to get
to his home in Fairbanks. |
 |
 |
 |
 |
|
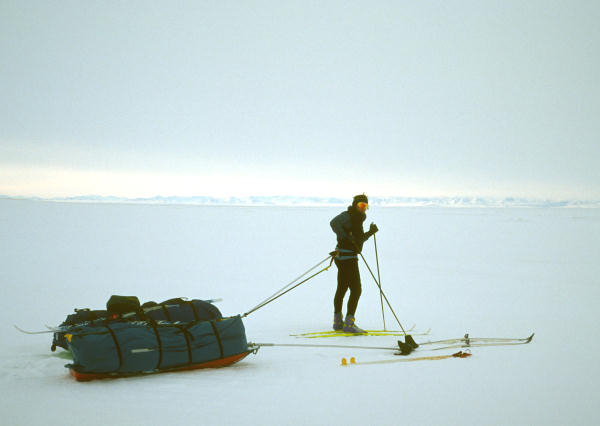
Pulling full sleds across
the North Slope of Alaska. 10+ days without
re-supply and camping in -40 F takes a lot of food and
gear. |
Sled hitch poles also double
as good "cooking pot poles" ... for melting snow for
water over fires. |
Skiing sleds help you to
celebrate winter, meet unique people ... |
... and ski to cool places. |
|
|
 |
|
For the stories behind the
above pictures ... check out
my Kindle
ebook on Amazon or
my Apple iTunes ebook. |
|
|
|
|
|
So there you go. Now you should have enough
information to
build a single-pole skiing sled. Now build one and go on a ski
trip to someplace cool !! |
|
|
|
Alaska Backcountry XC Skiing |
|